Using Rust in Jupyter Notebooks on Windows

I highly recommend you to read this checklist where I explain, in 6 easy steps, how to install Jupyter Lab (Jupyter Server + Jupyter Lab UI) and xeus-cling (C++ kernel).
Indeed I assume you can :
- 1 - Open an Ubuntu in WSL on your favorite WIN11 host (if this gets tricky, you’re in real trouble. Try to call Houston, you never know… 🚀)
- 2 - Then change to the directory, on the WIN11 host, where you plan to keep your Notebooks
cd /mnt/c/Users/phili/OneDrive/Documents/Programmation/rust_jupyter

- 3 - Activate the conda virtual environment in which Jupyter has been installed
conda activate multi_jupyter
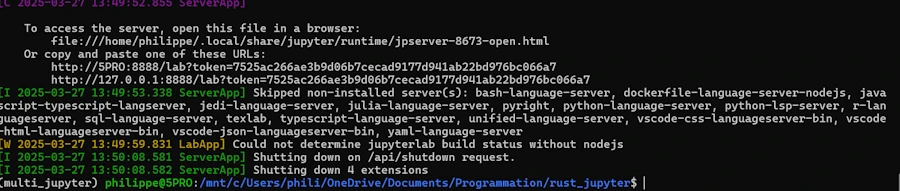
- 4 - Launch the Jupyter Lab from Ubuntu terminal
jupyter lab --no-browser --ip=0.0.0.0

- 5 - Exit the server using the
File/Shut Downoption in Jupyter Lab UI
Note about the name of the virtual environment
In the previous checklist the virtual environment was named cpp_jupyter. Since I will use it with C++ and Rust I renamed it with the following 2 commands :
conda create --name multi_jupyter --clone cpp_jupyter
conda remove --name cpp_jupyter --all
Note about Jupyter components
- Jupyter : open source project (Julia + Python + R)
- Jupyter Lab : the frontend. Launched with
jupyter lab --no-browser --ip=0.0.0.0for example - Jupyter Server : the backend, manage the kernels, the notebooks… Used by Jupyter Lab
- jupyter lab = jupyter server + frontend (lab typically)
- Kernels :
- ipykernel for Python
- xeus-cling for C++
- evcxr_jupyter for Rust
Obviously, at this stage, Rust kernel is not yet installed but we should be on the same page. If not, do not read further until you can get the Jupyter Lab in your browser. Again, feel free to read this checklist
1. Install & Check Rust
In the Ubuntu terminal
curl https://sh.rustup.rs -sSf | sh -s -- -y

Restart the shell source $HOME/.cargo/env
rustc --version
cargo --version

2. Install the evcxr_jupyter kernel & Check
In the Ubuntu terminal
cargo install evcxr_jupyter
evcxr_jupyter --install
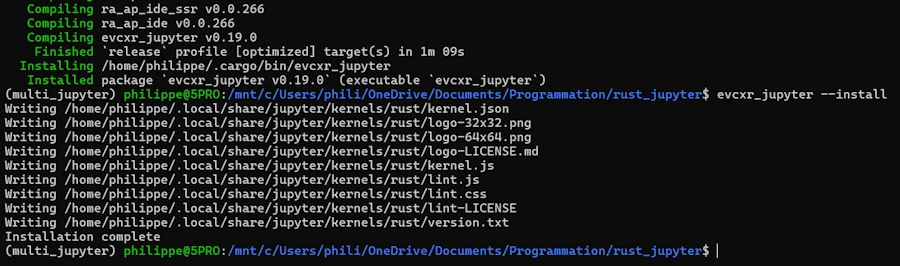
Let’s check everything is OK
jupyter kernelspec list

Above I see the Python kernel, 3 C++ kernels and the Rust kernel.
3. Run Jupyter Lab
In the Ubuntu terminal
jupyter lab --no-browser --ip=0.0.0.0
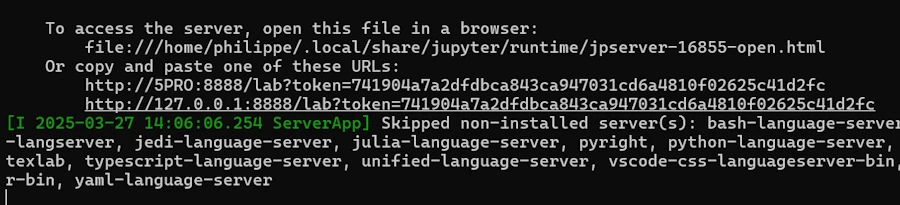
Click on the line that says : http://127.0.0.1:8888/lab?token=741904a7a2dfdbca843ca947031cd6a4810f02625c41d2fc
Tadaa !

Let’s write some code

It works but…
- TOO BAD. There is no way to set a breakpoint 😡. This is a problem with the Rust kernel. Indeed with the Python or C++ kernels, “Yes we can!”. To tell the truth I’m a little bit disappointed.
- Like in C++, I had to remove the
main()function - IMPORTANT. It seems that in a Notebook, every cell and every block (‘{‘ … ‘}’) are compiled separately so even if I know the code was working (on Compiler Explorer for example) I had to add 2 curly braces : one at the top and another at the bottom
- As one can see in the comments, I tried to add some lifetime in the signature of the
linked_list_midpoint()function but it did’nt really help.
Just to make sure, here is the original code:
// Define a struct to represent a singly linked list node
#[derive(Debug)]
struct ListNode {
    val: i32,
    next: Option<Box<ListNode>>,
}

// Implement ListNode
impl ListNode {
    fn new(val: i32, next: Option<Box<ListNode>>) -> Self {
        ListNode { val, next }
    }
}

// Function to find the midpoint of the linked list
fn linked_list_midpoint(head: &Option<Box<ListNode>>) -> &ListNode {
// fn linked_list_midpoint<'a>(head: &'a Option<Box<ListNode>>) -> &'a ListNode {
    let mut slow = head;
    let mut fast = head;

    // Traverse the list using two pointers
    while let Some(f_node) = fast {
        if let Some(f_next) = &f_node.next {
            fast = &f_next.next;
            if let Some(s_node) = slow {
                slow = &s_node.next;
            }
        } else {
            break;
        }
    }

    // At this point, slow points to the midpoint node
    slow.as_ref().unwrap()
}

fn main() {
    // Create linked list: 1 -> 2 -> 4 -> 7 -> 3
    let values = vec![1, 2, 4, 7, 3];
    let mut head: Option<Box<ListNode>> = None;

    // Build the list in reverse order
    for &val in values.iter().rev() {
        head = Some(Box::new(ListNode::new(val, head)));
    }

    // Find and print the midpoint
    let mid = linked_list_midpoint(&head);
    println!("Midpoint value: {}", mid.val);
}
Now, here is the code of the cell. Adding the curly braces is NOT optimal, I know, but at least I can check that the toolchain is in place, the compiler working etc.
{
// Define a struct to represent a singly linked list node
#[derive(Debug)]
struct ListNode {
    val: i32,
    next: Option<Box<ListNode>>,
}

// Implement ListNode
impl ListNode {
    fn new(val: i32, next: Option<Box<ListNode>>) -> Self {
        ListNode { val, next }
    }
}

// Function to find the midpoint of the linked list
fn linked_list_midpoint(head: &Option<Box<ListNode>>) -> &ListNode {
    let mut slow = head;
    let mut fast = head;

    // Traverse the list using two pointers
    while let Some(f_node) = fast {
        if let Some(f_next) = &f_node.next {
            fast = &f_next.next;
            if let Some(s_node) = slow {
                slow = &s_node.next;
            }
        } else {
            break;
        }
    }

    // At this point, slow points to the midpoint node
    slow.as_ref().unwrap()
}

// fn main() {
    // Create linked list: 1 -> 2 -> 4 -> 7 -> 3
    let values = vec![1, 2, 4, 7, 3];
    let mut head: Option<Box<ListNode>> = None;

    // Build the list in reverse order
    for &val in values.iter().rev() {
        head = Some(Box::new(ListNode::new(val, head)));
    }

    // Find and print the midpoint
    let mid = linked_list_midpoint(&head);
    println!("Midpoint value: {}", mid.val);
// }
}
What is next ?
- I can easily write Rust code snippets and add some documentation using Jupyter Notebooks
- The process is :
- Run Ubuntu
conda activate multi_jupytercd /mnt/c/Users/phili/OneDrive/Documents/Programmation/rust_jupyterjupyter lab --no-browser --ip=0.0.0.0
To speed up things, I created a script (run_rust_jupyter.sh saved in my home) and an alias so that I just have to type rustnb. Below, read the comments :
#!/bin/bash

# chmod +x ~/run_rust_jupyter.sh
# ./run_rust_jupyter.sh

# Create an alias
#   At the end of ~/.bashrc add :
#       alias rustnb='~/run_rust_jupyter.sh'
#   Then                : source ~/.bashrc
#   Then you can invoke : rustnb

# ! IMPORTANT Load Conda into the shell (critical for using 'conda activate' in scripts)
source ~/miniconda3/etc/profile.d/conda.sh

# Activate the multi_jupyter environment
echo "Activating conda environment: multi_jupyter"
conda activate multi_jupyter

# Move to the directory
cd /mnt/c/Users/phili/OneDrive/Documents/Programmation/rust_jupyter || {
    echo "Directory not found."
    exit 1
}

# Launch Jupyter Lab
echo "Starting Jupyter Lab..."
jupyter lab --no-browser --ip=0.0.0.0
Today, I’m still waiting for the book : The Rust Programming Language

How to update ?
Update of JupyterLab
- Make sure JupyterLab server is closed
- Under the Ubuntu session
conda activate multi_jupyter
conda update -n base -c defaults conda
conda update -c conda-forge jupyterlab
jupyter lab --version
Update of the Rust Kernel
On this page, check the latest version.
Get current version
- In the terminal
cargo install --list | grep evcxr_jupyter - In a Notebook, you can alternatively create a new cell and type
:versionThen CTRL+ENTER
Update Rust
In the terminal
rustup update
rustc --version
Update Rust Kernel
cargo install evcxr_jupyter --force
evcxr_jupyter --install
cargo install --list | grep evcxr_jupyter