Linux Mint Installation and Configuration
Table of Contents
- Installation
- Update & upgrade
- Enable automatic update
- Enable hibernation
- Configure TimeShift
- Share a public directory with Windows
- Access the Public shared directory on a WIN 11 host
- Enable SSH
- Install Git
- Install Meslo Fonts
- Install Oh My Posh
- Install VSCode
- Install Brave
- Install Chrome
- Create a shortcut keys to launch an app
- Enable SSH
- Install PowerShell
- Install Docker
- Install MS Fonts
- Install Anaconda
- “Modern” Linux
- Create some alias
- Because I can’t remember
Installation
- Boot with a USB key
- Swith the keyboard to FR
gpartedto delete partitions- Mint installation
- Reboot
Update & upgrade
sudo apt update
sudo apt dist-upgrade
sudo apt upgrade
Enable automatic update
sudo apt install unattended-upgrades
dpkg-reconfigure --priority=low unattended-upgrades
Enable hibernation
- Read : https://forums.linuxmint.com/viewtopic.php?t=284100
free -h                                 # note the size of RAM
swapon                                  # we will use swap = RAM
sudo swapoff -a

SIZE=16                                 # 16 MB
sudo dd if=/dev/zero of=/swapfile bs=1M count=$(($SIZE * 1024))
sudo chmod 0600 /swapfile
sudo mkswap /swapfile
sudo sed -i '/swap/{s/^/#/}' /etc/fstab
sudo tee -a /etc/fstab<<<"/swapfile  none  swap  sw 0  0"

RESUME_PARAMS="resume=UUID=$(findmnt / -o UUID -n) resume_offset=$(sudo filefrag -v /swapfile|awk 'NR==4{gsub(/\./,"");print $4;}') "

if grep resume /etc/default/grub>/dev/null; then echo -e "\nERROR: Hibernation already configured. Remove the existing configuration from /etc/default/grub and add these parameters instead:\n$RESUME_PARAMS";else sudo sed -i "s/GRUB_CMDLINE_LINUX_DEFAULT=\"/GRUB_CMDLINE_LINUX_DEFAULT=\"$RESUME_PARAMS/" /etc/default/grub;fi

sudo update-grub

# Copy Paste the lines below as a whole
sudo tee /etc/polkit-1/localauthority/50-local.d/com.ubuntu.enable-hibernate.pkla <<'EOB'
[Enable hibernate]
Identity=unix-user:*
Action=org.freedesktop.login1.hibernate;org.freedesktop.login1.handle-hibernate-key;org.freedesktop.login1;org.freedesktop.login1.hibernate-multiple-sessions
ResultActive=yes
EOB
- Reboot
- The answer to the line below should be
yes(or click “the red button”,hibernateshould be available)
busctl call org.freedesktop.login1 /org/freedesktop/login1 org.freedesktop.login1.Manager CanHibernate
Configure TimeShift
- Watch : https://youtu.be/HKCowLHiQ8o?si=4mzAjuonjO3upx9p&t=775
Share a public directory with Windows
sudo apt install samba -y
sudo apt install wsdd -y
sudo service wsdd status
sudo mkdir -p /home/public
sudo chmod 777 /home/public
sudo nano /etc/samba/smb.conf
- Comment the 2 lines below (I use to add a TAG “Philippe” to track my modifications)
# Philippe
# interfaces = 127.0.0.0/8 eth0
# bind interfaces only = yes
- Before “### Debugging/Accounting ###” add the folowing
# Philippe
   server min protocol = SMB3
   ntlm auth = yes
   unix charset = UTF-8
   # Disable printer
   load printers = no
   printing = bsd
   printcap name = /dev/null
   disable spoolss = yes
- At the end of the file add the lines below
# Philippe
[Docs]
   path = /home/public
   writable = yes
   guest ok = yes
   guest only = yes
   create mode = 0777
   directory mode = 0777
- Save & exit
sudo systemctl restart smbd
sudo ufw allow samba
- Read : https://techviewleo.com/configure-samba-file-sharing-on-linux-mint/
Access the Public shared directory on a WIN 11 host
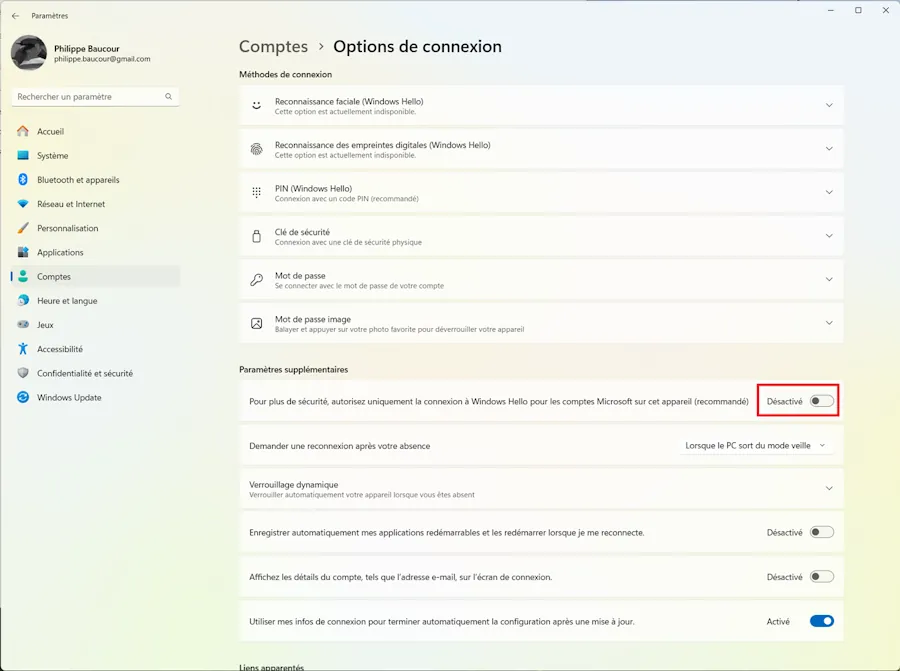
WIN11 host
- You have a Public shared directory that you can access from another WIN client. Read this page if needed.
- WIN + I, Accounts, Connexion Options
- Deselect the option “Only Hello…”.
LINUX host
sudo apt smbclient
sudo nano /etc/samba/smb.conf
- Modify smb.conf (re-read the “Share a public directory with Window” section if needed)
# Philippe
server min protocol = SMB3
client min protocol = SMB3       # = NT1 if your internet box requires it
- Save & exit
sudo systemctl restart smbd
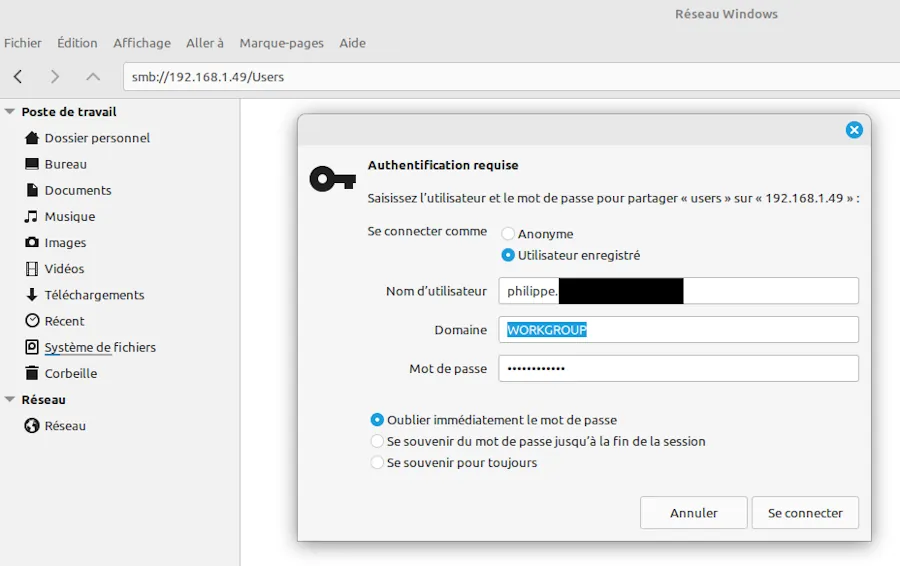
- You use your Microsoft credentials :
E-mailandMicrosoft account password
CLI
- 192.168.1.49 is the WIN11 host ip address
smbclient -L 192.168.1.49 -U philippe.XXX@YYY
Password for [philippe.XXX@YYY]:

	Sharename       Type      Comment
	---------       ----      -------
	ADMIN$          Disk      Administration à distance
	C$              Disk      Partage par défaut
	IPC$            IPC       IPC distant
	Users           Disk
Reconnecting with SMB1 for workgroup listing.
do_connect: Connection to 192.168.1.49 failed (Error NT_STATUS_RESOURCE_NAME_NOT_FOUND)
Unable to connect with SMB1 -- no workgroup available
smbclient -U philippe.XXX@YYY //192.168.1.49/Users
Password for [philippe.XXX@YYY]:
Try "help" to get a list of possible commands.
smb: \> ls
  .                                  DR        0  Sat Nov  4 15:38:20 2023
  ..                                DHS        0  Fri Nov 10 11:03:46 2023
  Default                           DHR        0  Sat Nov  4 17:57:30 2023
  desktop.ini                       AHS      174  Sat May  7 07:22:32 2022
  phili                               D        0  Fri Nov 10 11:03:49 2023
  Public                             DR        0  Sat Nov  4 15:29:17 2023

		249823487 blocks of size 4096. 225382835 blocks available
GUI
Read
- https://www.40tude.fr/shared-folder-in-local-network/
- https://losst.pro/en/how-to-access-windows-share-in-linux
- https://forum.manjaro.org/t/access-windows-11-shared-folder-from-manjaro-kde-linux/113213/5
- https://www.malekal.com/comment-utiliser-smbclient-exemples/
- https://4sysops.com/archives/the-smb-protocol-all-you-need-to-know/
Enable SSH
sudo apt install openssh-server -y
sudo systemctl is-enabled ssh
# si besoin
sudo systemctl enable ssh
sudo systemctl start ssh
sudo systemctl status ssh
# doit être running

# firewall
sudo ufw allow ssh

# si besoin mais normalement il est running
sudo systemctl is-enabled ssh
sudo ufw enable
sudo ufw reload
sudo ufw status verbose # si besoin
Install Git
sudo apt install git -y
git config --global user.name "MON NOM"            # avec les guillemets
git config --global user.email xxx@gmail.com
git config --list
Install Meslo Fonts
- Aller sur : https://www.nerdfonts.com/font-downloads
- Recupérer Meslo
- Décompresser le zip dans un répertoire Meslo
- Supprimer le readme.md et le fichier LICENSES.txt du répertoire
- Créer un répertoire ~/.local/share/fonts
- Y copier le répertoire Meslo
- Reconstruire le cache des fonts
# Si Meslo.zip est dans ~/Téléchargements
cd ~/Téléchargements
unzip Meslo.zip -d ./Meslo
rm ./Meslo/LICENCE.txt
rm ./Meslo/README.md
mkdir -p ~/.local/share/fonts
mv ./Téléchargements/Meslo ~/.local/share/fonts
fc-cache -fv
- Lire : https://www.baeldung.com/linux/install-multiple-fonts
Install Oh My Posh
curl -s https://ohmyposh.dev/install.sh | sudo bash -s
- Update terminal preferences and use
MesloLGM Nerd Font - Not specific to the font :
- Font size = 11
- Windows size = 144 x 34
oh-my-posh get shell
- The instructions here are specific to bash
- Edit ~/.bashrc
- Add, at the very end
eval "$(oh-my-posh init bash)"
- Save & Close
- Reload the profile
exec bash
- Read : https://ohmyposh.dev/docs/installation/linux
Install VSCode
sudo apt install dirmngr ca-certificates software-properties-common apt-transport-https -y

curl -fSsL https://packages.microsoft.com/keys/microsoft.asc | sudo gpg --dearmor | sudo tee /usr/share/keyrings/vscode.gpg > /dev/null

echo deb [arch=amd64 signed-by=/usr/share/keyrings/vscode.gpg] https://packages.microsoft.com/repos/vscode stable main | sudo tee /etc/apt/sources.list.d/vscode.list

sudo apt update
sudo apt install code
- If Oh my Posh is installed
- Open a Terminal
- Select Configure Terminal Settings in the drop down list (close to the +)
- Search for “font”
- In the Terminal > Integrated > Font Family field, type
MesloLGM Nerd Font
Install Brave
sudo apt install curl
sudo curl -fsSLo /usr/share/keyrings/brave-browser-archive-keyring.gpg https://brave-browser-apt-release.s3.brave.com/brave-browser-archive-keyring.gpg
echo "deb [signed-by=/usr/share/keyrings/brave-browser-archive-keyring.gpg] https://brave-browser-apt-release.s3.brave.com/ stable main"|sudo tee /etc/apt/sources.list.d/brave-browser-release.list
sudo apt update
sudo apt install brave-browser
- Read : https://brave.com/linux/
Install Chrome
- S’assurer que le gestionnaire synaptic n’est PAS ouvert
# installez la clé de signature de package
wget -q -O - https://dl-ssl.google.com/linux/linux_signing_key.pub | sudo apt-key add -

# ajouter le référentiel Chrome
sudo add-apt-repository "deb http://dl.google.com/linux/chrome/deb/ stable main"

sudo apt update
sudo apt install google-chrome-stable -y
Create a shortcut keys to launch an app
- CTRL + ALT + T already exists for terminal
- You want to add, CTRL + ALT + G for Google Chrome
- WIN key, find the app icon, right click, select “Add to Desktop”
- WIN + D, right click the icon, select “Properties”
- Basic Tab, copy the content of “Command TextBox”
- WIN key, launch the Keyboard app, in the top of the GUI, click the “Shortcuts” tab
- Bottom of the GUI, press “Add custom shortcuts”
- Add the name of the app, paste the command, click “Add”
- In the “key shortcuts” list, select one of the unasigned entry, press the keys (CTRL + ALT + G for example)
- You can then test the shortcut right away
- Once satisfied, close the Keyboard app
- WIN + D, deleted the icon of the app from the Desktop
Enable SSH
cd ~
mkdir .ssh
cd .ssh
ssh-keygen # Enter à chaque question posée
cat id_rsa.pub
Connect to GitHub with ssh
- Copier la sortie du
catprécédent - Aller sur GitHub pour ajouter la clé publique au compte
- Cliquer sur profil en haut à droite
- Settings dans la liste
- À gauche de la page chercher SSH & GPG
- Click bouton New SSH Key
-
Coller la clé publique
- Voir : https://youtu.be/3O4ZmH5aolg?si=OVWCEeq_0nj-UExM&t=359
Install PowerShell
sudo apt install dirmngr ca-certificates software-properties-common gnupg gnupg2 apt-transport-https curl -y

curl -fsSL https://packages.microsoft.com/keys/microsoft.asc | gpg --dearmor | sudo tee /usr/share/keyrings/powershell.gpg > /dev/null

echo deb [arch=amd64,armhf,arm64 signed-by=/usr/share/keyrings/powershell.gpg] https://packages.microsoft.com/ubuntu/22.04/prod/ jammy main | sudo tee /etc/apt/sources.list.d/powershell.list

sudo apt update
sudo apt install powershell -y

pwsh
Update-Help
exit
To use PowerShell rather than bash
cat /etc/shells
chsh -s /usr/bin/pwsh
Install Docker
sudo apt install docker docker-compose docker-doc docker-registry docker.io -y
sudo groupadd -f docker
sudo usermod -aG docker $USER
newgrp docker
sudo systemctl restart docker
docker image ls
docekr --version
docker --help
Install MS Fonts
sudo apt install ttf-mscorefonts-installer
List available fonts
fc-list
fc-list | grep Meslo
fc-list : family style | grep Meslo
fc-match -s Arial
Install Anaconda
- https://www.anaconda.com/download
bash Anaconda3-2023.09-0-Linux-x86_64.sh
- Read the licence and answer “yes” few times
- Close and reopen the terminal
- Update conda
- Make sure everythings works
conda update conda
conda update -n base --all
conda info --envs
conda list
anaconda-navigator
- Don’t use “base” virtual environment
- Create and use your own
conda create --name env1 python=3.11.5
conda activate env1
...
conda update -n env1 --all
...
conda activate base
conda remove --name env1 --all
- If the display of the current conda virtual env does’nt fit the Oh my Posh prompt try this or modify the Oh my Posh theme
conda config --set changeps1 False
“Modern” Linux
In addition to man
- Too Long, Did’nt Read
sudo apt install tldr -y
tldr --update
tldr wget
- https://www.oreilly.com/library/view/learning-modern-linux/9781098108939/
ls -> eza
sudo mkdir -p /etc/apt/keyrings
wget -qO- https://raw.githubusercontent.com/eza-community/eza/main/deb.asc | sudo gpg --dearmor -o /etc/apt/keyrings/gierens.gpg
echo "deb [signed-by=/etc/apt/keyrings/gierens.gpg] http://deb.gierens.de stable main" | sudo tee /etc/apt/sources.list.d/gierens.list
sudo apt update
sudo apt install eza
- https://github.com/eza-community/eza
- https://linuxiac.com/eza-command-listing-files-in-linux/
cat -> bat
sudo apt install bat -y

mkdir -p ~/.local/bin
ln -s /usr/bin/batcat ~/.local/bin/bat
export MANPAGER="sh -c 'col -bx | bat -l man -p'"  # once satisfied, add the line to ~/.bashrc
- https://github.com/sharkdp/bat
- https://www.linode.com/docs/guides/how-to-install-and-use-the-bat-command-on-linux/
top -> btop
sudo apt install btop -y
- Once on screen strike “m” for menu, visit the help and options
- Watch : https://youtu.be/ghWECXWi9kU?si=MNThwKisHp2yfTD7&t=170
Others
- du -> dust : https://github.com/ibraheemdev/modern-unix
- df -> duf : https://github.com/muesli/duf
- find -> fd : https://github.com/sharkdp/fd
- grep -> ripgrep : https://github.com/BurntSushi/ripgrep
- ps -> procs : https://github.com/dalance/procs
More
- https://github.com/ibraheemdev/modern-unix
Create some alias
- Edit
~/.bashrcand, at the very end, add the following :
    if [ -f ~/.bash_aliases ]; then
    . ~/.bash_aliases
    fi
- Create
~/.bash_aliasesand edit it as follow (see previous section forezaandbat)
alias ls='eza -al'
alias cat='bat'
Because I can’t remember
Change Cursor
- Thèmes/Para avancés…/Souris/Yaru
Symbolic links
- Avoid relative paths
ln -s /home/share/installation.md ln_installation.md           # create link in current dir
ln -s /home/share/mydoc.md /home/philippe/Bureau/ln_mydoc.md   # create link on the desktop
Change the name of the host
- Edit as root /etc/hostname